The Formilla WordPress Live Chat plugin is used by thousands of WordPress and WooCommerce websites today. It is one of the best live chat plugins available for WordPress, with over 100 reviews and a 4.8 star rating.
This post will show you exactly how to get the Formilla Live Chat plugin installed on your website in just a few steps. Start to chat with your visitors to understand their needs, convert them into actual sales, and learn exactly what they are doing on your website to improve your product or service.
Quickly jump around this post with this index:
Use our Standard (free) package for life, or upgrade to any of our Premium plans after your 15-day free trial of the Growth package for more powerful features.
Once you have installed our live chat WordPress live chat plugin, you can chat with your website customers using the Formilla web dashboard, our Windows desktop app, or iPhone, iPad, and Android apps when you’re on the road (Premium option).
Below is a list of our most popular features. Be sure to read our full Features and Pricing to learn even more.
Use Chat Smart Messages to initiate an automatic live chat conversation with your visitors while they’re browsing your website. You can easily configure this feature to display a custom message after just a few seconds.
Set your schedule by defining your hours available for each day of the week. Formilla will automatically mark you “Offline” from chat outside of your hours of availability.
Install our iPhone, iPad, and Android apps to never miss a chat when you’re away from your computer (Premium option).
Below you can see the Real-time Visitor Monitoring tab in focus on the mobile app (left-hand side), where you can watch your website traffic from anywhere in the world.
On the right is a view of the advanced visitor information at your fingertips. You can see what webpage your visitor is currently viewing, what country and region they are located, and send a chat request all from the same screen.
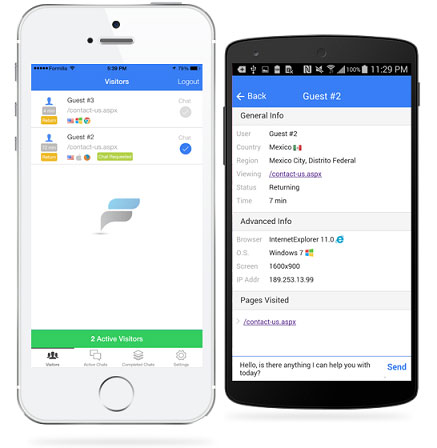
You’ll really enjoy the Real-time Visitor Monitoring feature as you get to see the number of active visitors on your WordPress website, and initiate live chats with them. View the visitor’s Country, their recently viewed web pages, operating system, internet browser, referring site, new user vs. returning, IP address, and more.
For a demo of the chat and agent dashboard in action, check out our chat demo video.
Configure Formilla to alert you with Real-time Website Visitor Alerts to get notifications when your visitors arrive to your website. Jump on the opportunity to chat with them! (Premium option).
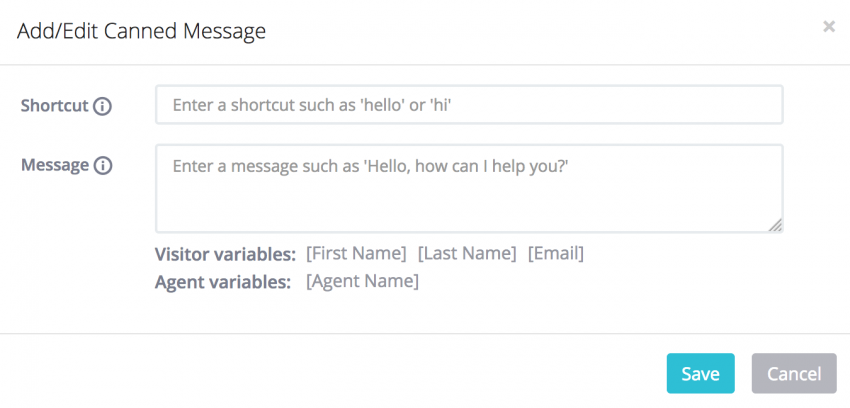
Create Canned Messages to respond to customers as quickly and efficiently as possible. If you find yourself repeating the same message to your customers, simply save the message as a shortcut such as “hello”, and use the shortcut when chatting to recall the full message such as “Hello, how can I help you?”
Be sure to check out our customer service scenarios guide to help you get started with a ton of canned responses right now.
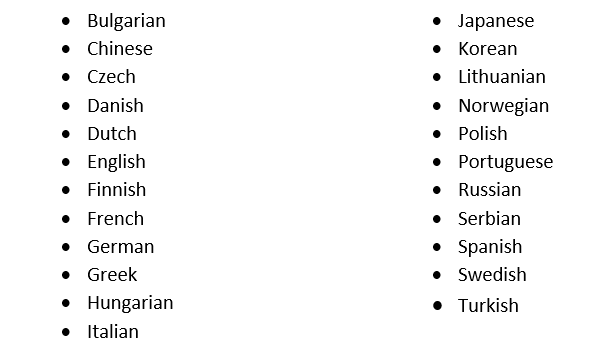
With the Language Support (International) customization option, you can customize the text of the online and offline chat forms. Our Premium packages allow you to customize your live chat widget in any language, including Spanish, French, German, Dutch, Portuguese, Chinese, Italian, and much more!
When you’re unavailable from chat, the live chat widget automatically converts into an offline chat widget, requiring at least the email address of the website visitor when they initiate a conversation. Never miss the chance to hear from a prospective customer by receiving their offline chat transcript right to your favorite email client.
Send a targeted message to the right audience with our marketing automation features. Use live chat 24X7 to collect leads, then keep customers coming back with easy to use email messaging. Use Marketing Popups to create important announcements about sales, product updates, and more.
Create a helper bot ready to assist with frequently asked questions around the clock, even when a live person is not available. The helper bot can be trained to become more and more accurate, and new questions you want the helper bot to know can even be pulled straight from chat conversations you have with your website visitors.
There are two ways to install Formilla Live Chat to your WordPress or WooCommerce site:
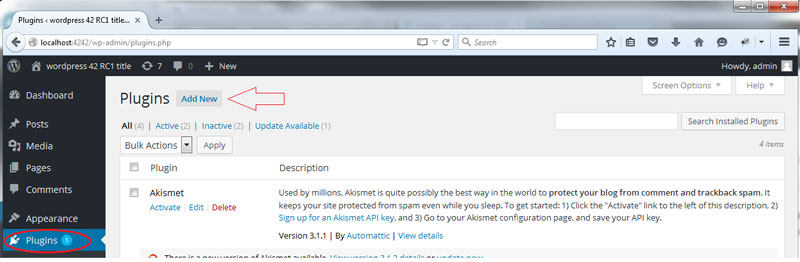
Login to your WordPress admin panel and click Plugins from the left hand-side. From the plugins page, click the “Add New” button at the top of the page as you can see below:
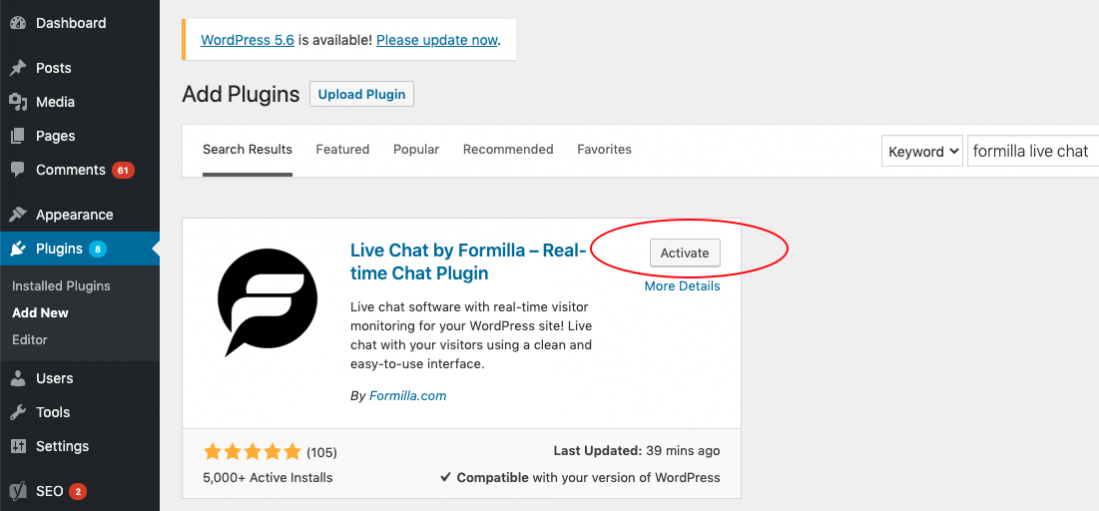
From the WordPress Add Plugins page, do a keyword search for “Formilla” to find the plugin. Click the “Install Now” button to begin the installation.
Note: while it is extremely rare to experience a website issue upon installation, it is always recommended to install plugins in a test or development environment first or at least after taking a back-up of your website.

Next, you’ll see the installation occur. Go ahead and click the “Activate” button as shown below. If you have any issues with the installation in this step, it’s likely due to the directory permissions on your web server. It’s best to reach out to your website administrator or host to determine the correct access level rights. If you’re stuck, just contact us so we can help!
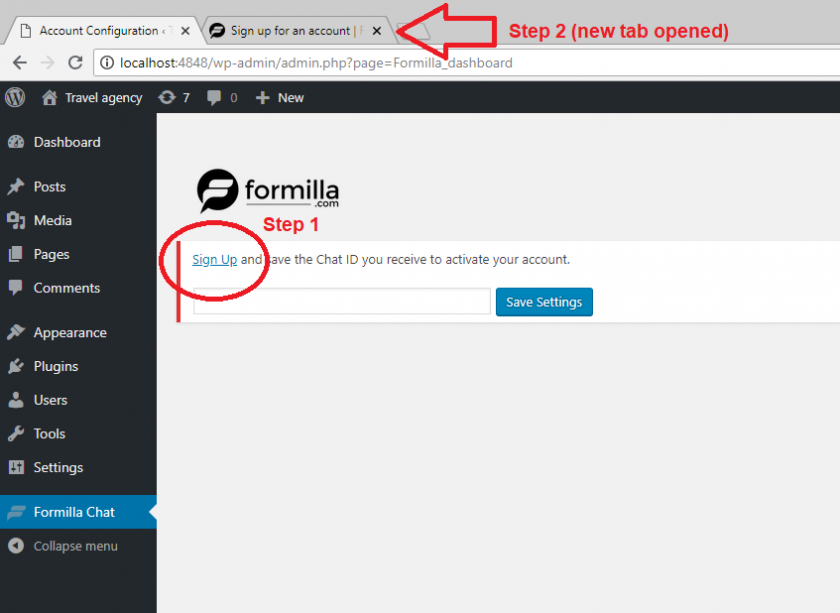
Now that the plugin is activated, find Formilla Live Chat from your Plugins page and begin by clicking the “Get Started” link. This will take you to the Formilla Chat section of your WordPress admin panel.

From the Formilla Chat menu, click the Sign Up link if you don’t currently have an account. This will open a 2nd browser tab where you can sign up for a free Formilla account.
Select the 2nd tab in your browser and enter the relevant information as shown below. Note: if you’re installing on a development machine (localhost) or a test site, you can simply enter the live website URL or something like http://localhost (don’t worry, you can change this later).
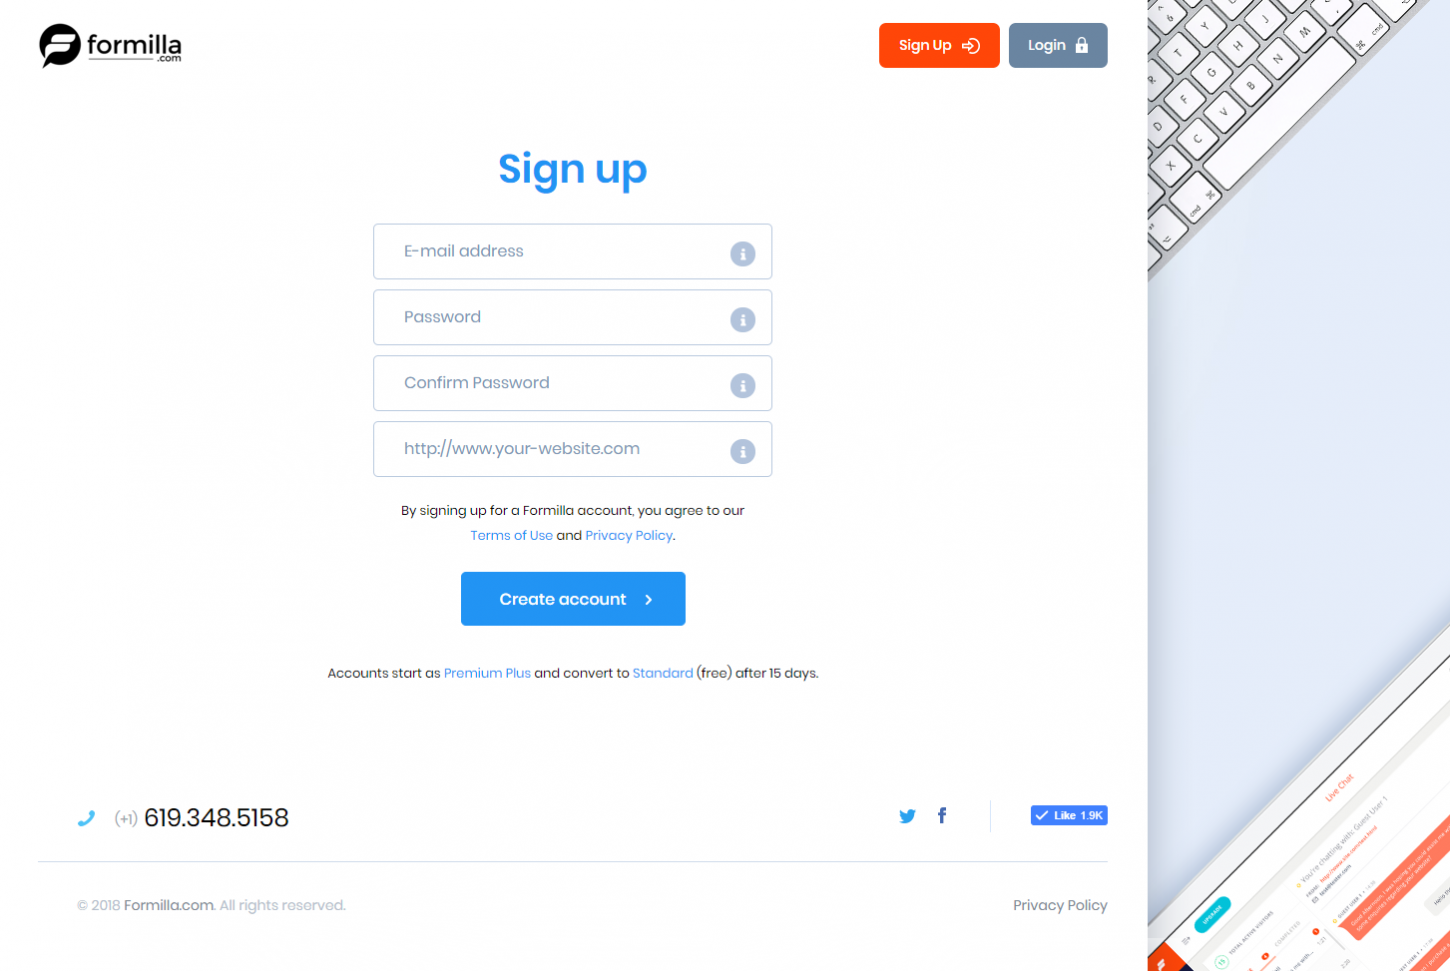
Also note that your Formilla account starts with a Premium trial for the first 15 days, then automatically downgrades to the Standard free live chat package if you choose not to upgrade. Don’t worry, we don’t take any billing information from you and it’s a completely risk free trial! Here is a link to our live chat features and pricing for comparison again.
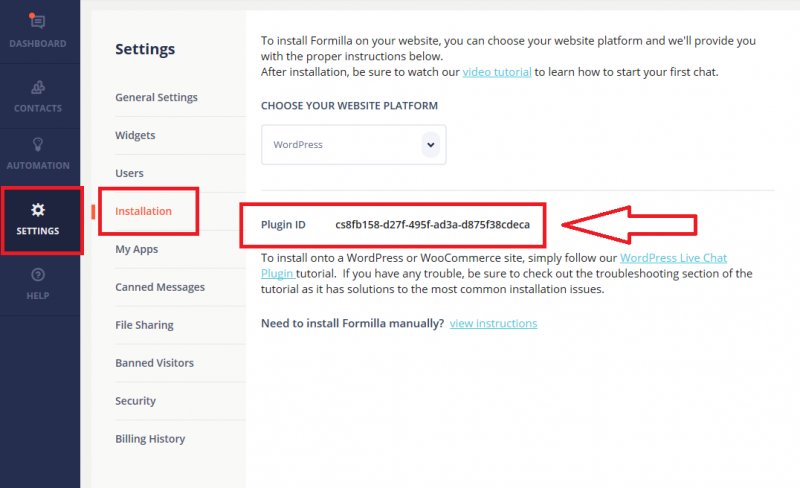
This next step you will copy the Plugin ID you received upon signing up. The Plugin ID is shown to you immediately upon creating your account and it is also sent to the email address you registered with your Formilla account.
You can always retrieve the Plugin ID from within your account at anytime as follows: Click on “Settings” in the left side of the Formilla menu, then click on “Installation” from the sub-menu that shows. You’ll notice the Plugin ID appears just below the drop-down menu for selecting your platform:
Now you can go back to your WordPress Admin in the first browser tab and paste the Chat ID you copied from the prior step. Make sure to paste the entire chat ID and click Save Settings. Once you save your Chat ID, you should see a Launch link to begin testing your chat. Keep reading…

You have now successfully activated your Formilla Live Chat plugin! View your website to ensure the live chat button and widget was installed properly as shown below.
You should appear online and the chat button should display on your website by default. Having trouble? Check out the troubleshooting section below.
The live chat button will install to your website in the bottom-right corner by default. The position of the button can be altered with some CSS changes within your Formilla account. This can be found on the Advanced Appearance tab of your chat widget’s settings. If you need any help with this, just contact us and we’ll be glad to help.

You can now simply go to the 2nd browser tab you opened earlier to get back to your Formilla.com live chat dashboard, where you can respond to website visitors in real-time. Remember, you can directly login to your Formilla account going forward; there is no need to login to your WordPress admin panel to access chat once you have it installed.
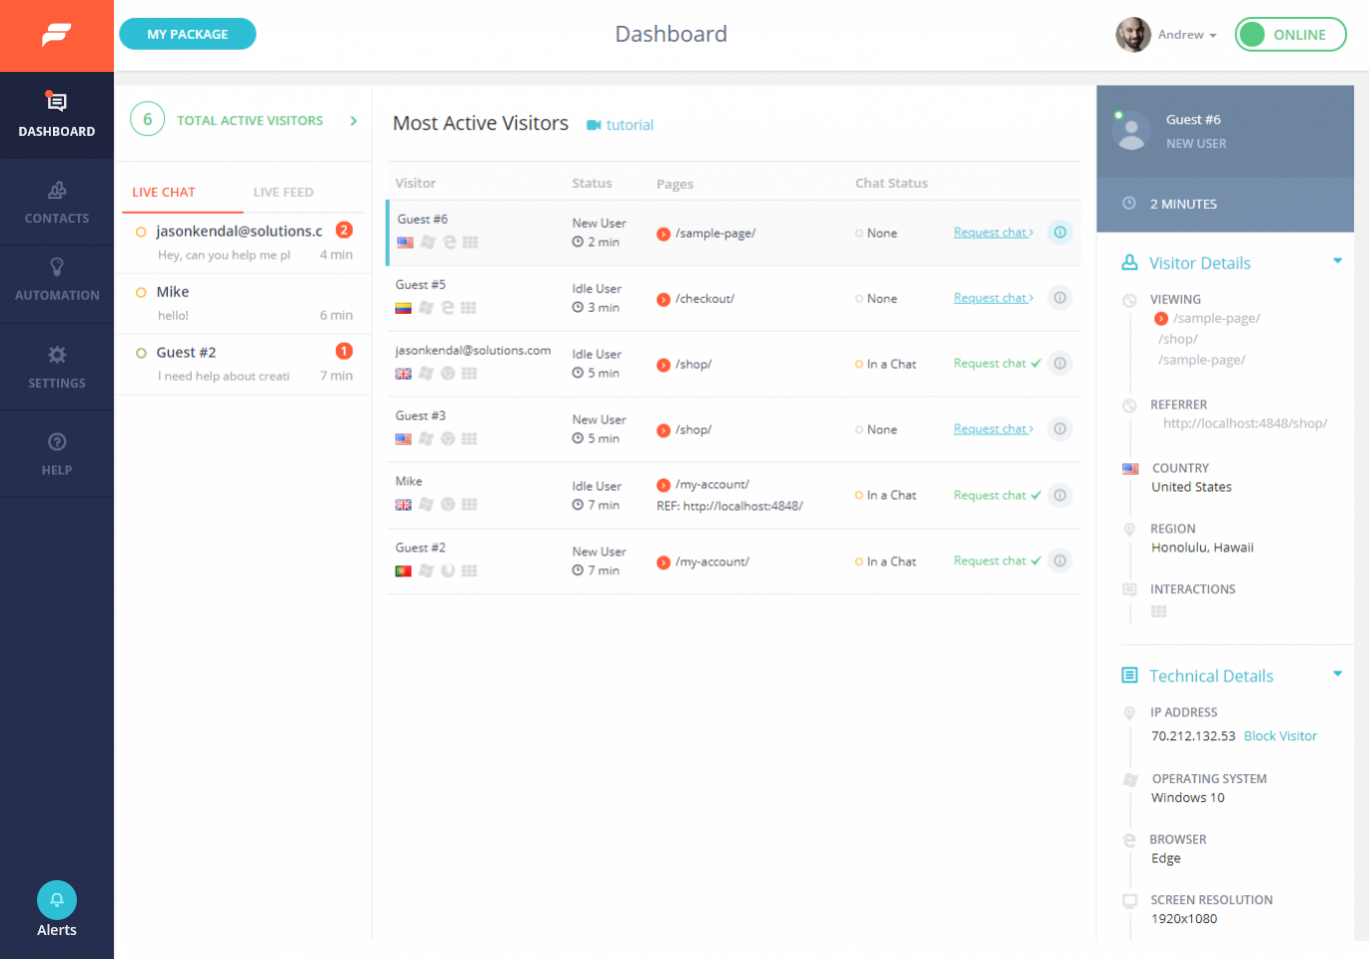
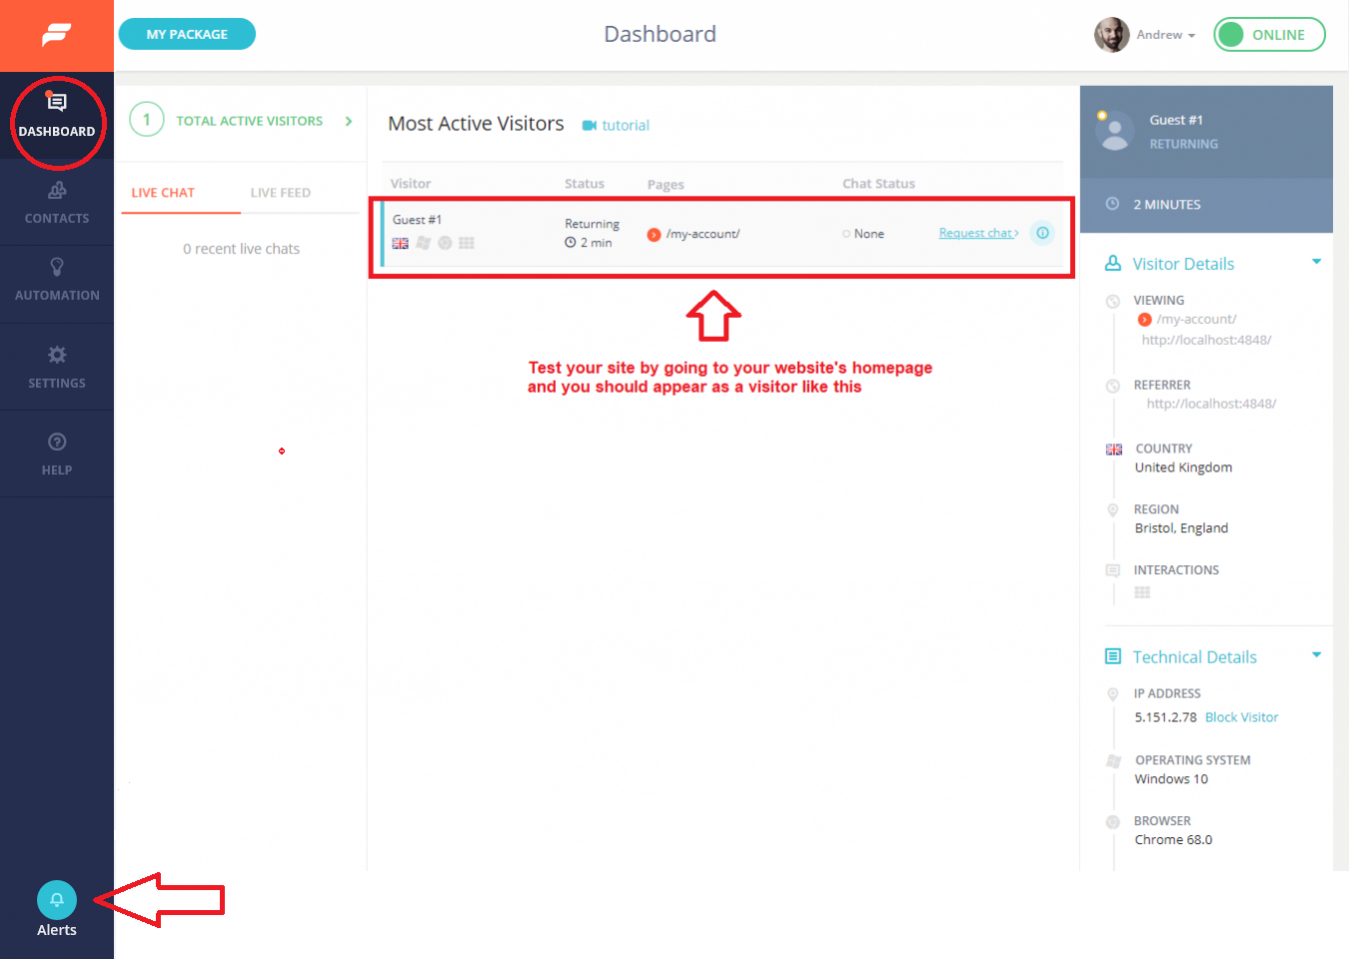
If you appeared online in the prior step when visiting your website, you should successfully appear as a visitor on your own live chat dashboard similar to below. Notice the “Alerts” bell icon on the bottom-left corner of your dashboard where you can modify alerts and sounds (this tutorial won’t get into those details).
Be sure to watch our live chat demo video to learn more about starting a test chat with yourself, and how to navigate the live chat dashboard, watch visitors on your website, and a whole lot more.
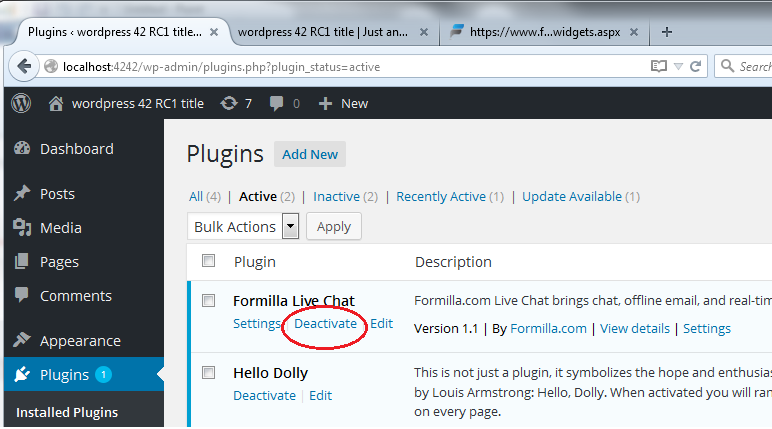
To install live chat on a specific web page or without using the plugin, start by disabling the live chat plugin if you have already installed it. Navigate to your WordPress admin section and click Plugins. Find the Formilla Live Chat plugin and click the “Deactivate” link.
The next step is to copy your unique chat script from within your Formilla account. Once logged in to your Formilla account, click on “Settings” on the left, then click on “Installation”. In the drop-down menu for selecting your platform, choose “My platform isn’t listed”.
Copy the script shown in the box from the Installation section.

Now let’s navigate back to your WordPress admin section and mouse over the “Appearance” menu, then select “Widgets” from the sub menu as shown. From here you can drag the Text widget to the right-hand side called Widgets Area. Paste the chat script you copied above as shown, then check the boxes you want it to display and click Save.
Using the flexibility of widgets, you can:

To make the most use out of the live chat software on your WordPress site, be sure to use these best practices to be extremely efficient, and improve engagement with your website visitors to turn them into actual customers.
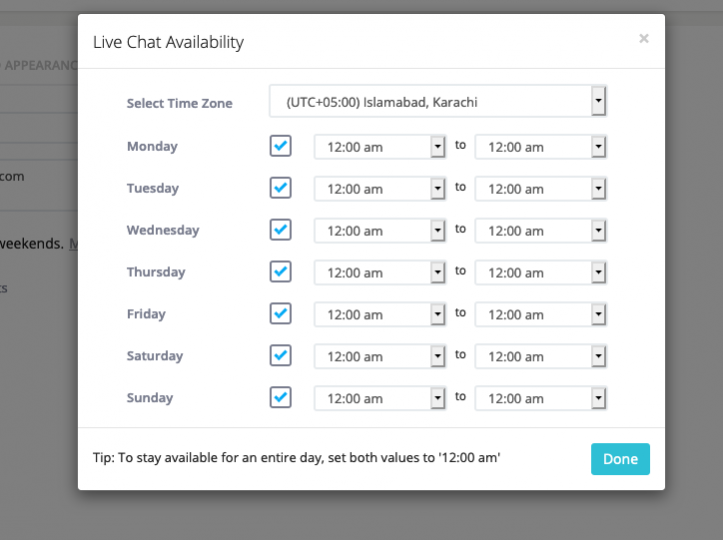
The first thing you’re probably thinking is: how am I going to be able to keep up with live chat when I have a million things to do as a small business owner? It’s actually really simple! Start by setting a simple schedule to be online and available to chat. I’ll show you how to do exactly that inside of your Formilla account.
Login to your Formilla account, mouse over “Settings” from the left menu and then choose “Widgets” from the sub-menu. Next, click the edit/pencil icon for your chat widget to enter the settings area. On the first tab called “Widget Details”, click on the “Modify Schedule” link. A pop-up will appear where you can define your hours for every day of the week, along with your timezone.
If you follow any tip within this guide, this is the one tip to follow. With Smart Messages, you get to sit back and relax, while Formilla does the heavy lifting for you.
Why waste time requesting chats manually from the dashboard when you can configure automated messages to pop-up and ask your visitors if they need any help? (remember, you have a million other things to do)
Smart Messages are really easy to configure, and you’ll notice a lot higher live chat engagement from your website visitors when you have them enabled.
Need help deciding on what message to display? Check out our customer service scenarios post for ideas.
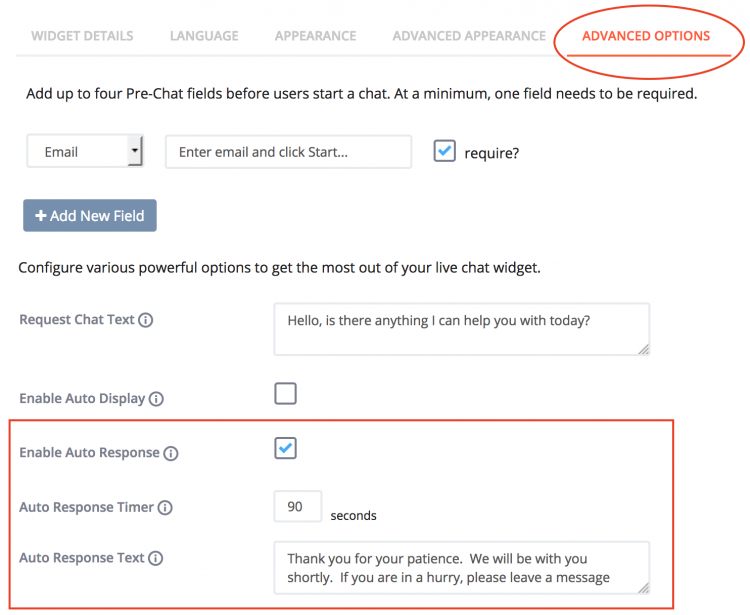
We always highly recommend enabling the Auto-response feature when using live chat software. There are times you will be busy doing something when a chat request comes in, or you might just simply miss a chat from time to time. That’s okay! Enable Auto-response to save the day. Here’s how:
Login to your Formilla account, mouse over “Settings” from the Formilla menu, click “Widgets” from the submenu that appears, then click the edit/pencil icon for your chat widget to enter the settings area. Click on the tab called “Advanced Options” to find the feature as shown below.
Check the box next to the “Enable Auto Response” setting and specify how long before Formilla should respond on behalf of you (we recommend anywhere between 60 and 120 seconds). Finally, enter a message and click “Save Changes”.
Tip: this is what we use as an Auto-response message to ensure we can get the visitor’s contact info at a minimum: “Thank you for your patience. We will be with you shortly. If you are in a hurry, please leave a message with your contact information and we will get back to you quickly!”
If you installed Formilla Live Chat and don’t see it on your WordPress site after following all the instructions, check to see if you’re using a plugin such as WP Super cache, W3 Total Cache, or some other similar caching plugin. WP Super Cache displays a timestamp when your webpage was last cached. If you right-click your webpage and choose View Source, you’ll notice at the very bottom something like this:
<!– Dynamic page generated in 1.178 seconds. –>
<!– Cached page generated by WP-Super-Cache on 2015-08-07 17:36:29 –>
If this date and timestamp is before your installation of Formilla, then you likely just need to refresh your cache. From your WordPress admin panel, find the WP Super Cache plugin settings and click the Delete Cache button from the Easy tab. Most caching plugins operate similarly in that there is a way to refresh or delete the cache. Once you have accomplished this, check your website to see if the live chat button appears as expected.
When you click your button, does it open the WordPress live chat widget only in some browsers but not others? Or better yet, you don’t even see the widget installed at all even after activating the plugin and reviewing the other troubleshooting steps above. This could be due to your website theme or template not declaring a DOCTYPE at the very top of your page(s). You can read more about the DOCTYPE html element here. To view whether you have a DOCTYPE and if it is the first thing in the html document, right-click your webpage and choose View Source, you should see something like this at the top:
<!DOCTYPE html>
<html>
<head>
…
…
Everything is installed, but if you’re still having trouble, aren’t appearing online, or have no idea what to do next: Don’t get frustrated, just CONTACT US! We’re always happy to help, and we mean that!