Custom Chat Bots work around the clock and are capable of automatically qualifying sales leads, booking sales meetings, and providing information about your products or services to customers without requiring a live person to be available.
The flexibility provided by custom bots makes them an efficient solution for handling common sales and support tasks, while freeing up your team to handle more complex inquiries. For example, you can configure multiple bots across your website based on key landing pages, learn where visitors are at in the sales process by asking them questions and collecting input, and perform specific actions based on visitor selection.
Some of the more popular use cases include:
Continue reading to learn how you can configure and deploy powerful custom chat bots on your website to perform many different tasks.
Formilla’s Custom Bots feature can be added to any existing paid plan, or sign-up for a free 15-day trial to get started (note: the Wix app is not supported at this time).
If you currently have a Formilla account, simply choose My Package at the top of your dashboard and click Upgrade Package to purchase the Custom Bot feature add-on.
Once Custom Bots are enabled with your plan, begin by mousing over Automation in the left menu of the Formilla dashboard, and select Custom Bots from the sub-menu that appears.
Next, click New Custom Bot from the top of the following page.
Let’s give our custom bot a name such as “Company ABC site bot”.
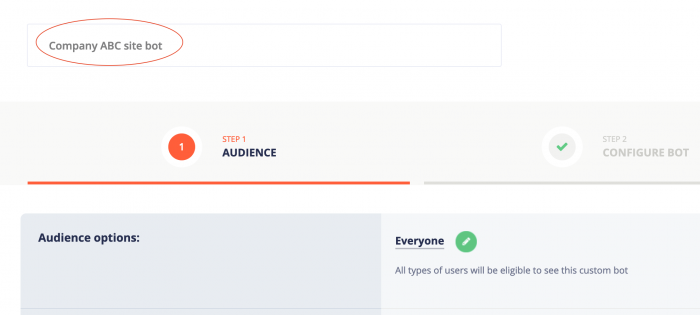
The first thing we’ll do is decide who we want to see this custom bot from the Audience tab.
It’s important to consider the primary use case for your custom bot to effectively decide who the audience will be. If you plan to enable this bot across your entire website, you can just leave the default settings as-is without making any changes (i.e. ‘Everyone’ will see the bot).
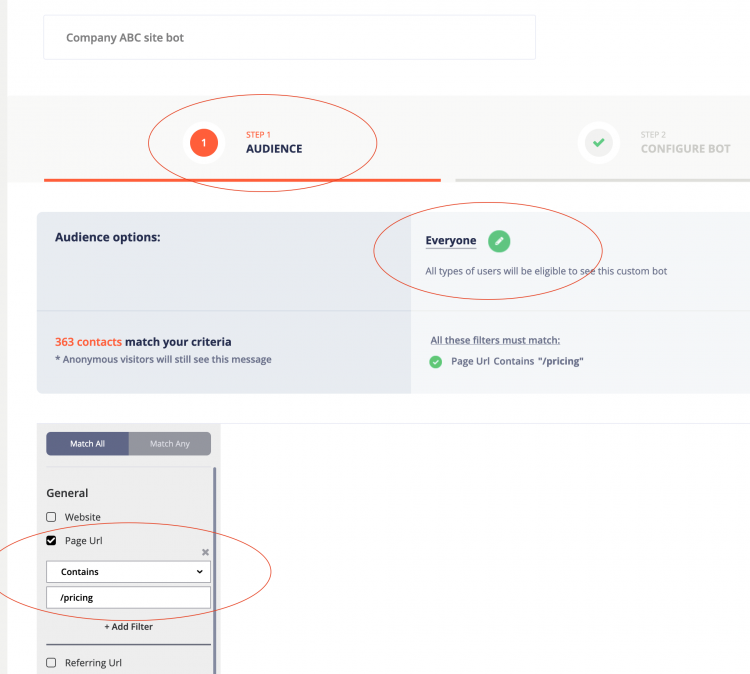
Otherwise, if you intend to deploy a custom bot that, for example, pre-qualifies visitors on your pricing page with the purpose of booking sales demos, you could setup a filter to display the bot only when the Page URL “Contains” your pricing page URL as shown.
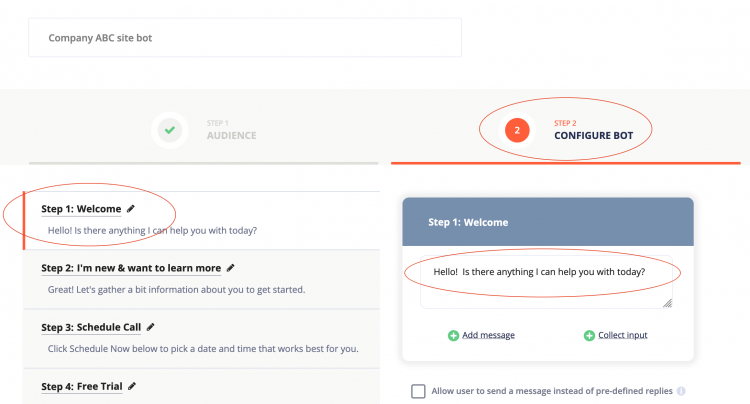
Select the 2nd tab labeled “Step 2 / Configure Bot” from the top of the page. This is where most of your time will be spent setting up your Custom Chat Bot.
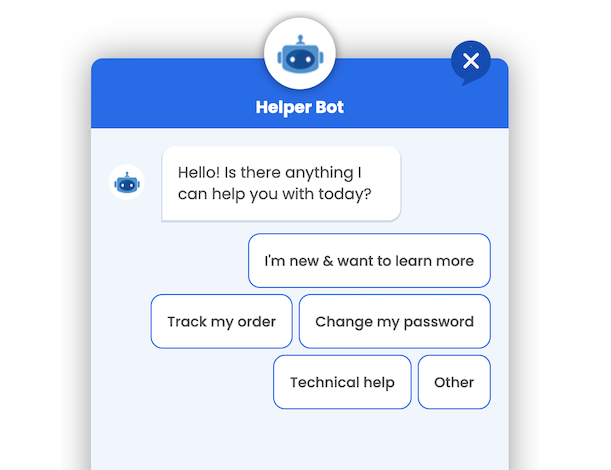
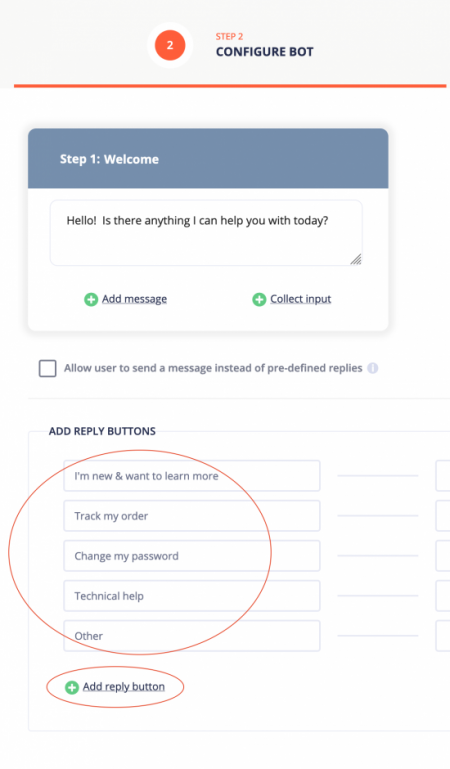
Step 1 is pre-created as the ‘Welcome’ step as it is the first message the visitor will see upon interacting with the bot. Let’s create a general triage bot by modifying the Welcome message to greet the visitor with “Hello! Is there anything I can help you with today?”.
Next, let’s select Add Reply Buttons to configure a few buttons for the visitor to choose from. You will notice the first two placeholder buttons are now shown, and we can click +Add reply button a few times to create several more buttons to include the following in our example here:
I’m new & want to learn more
Track my order
Change my password
Technical help
Other
This is what your custom bot setup should look like so far.
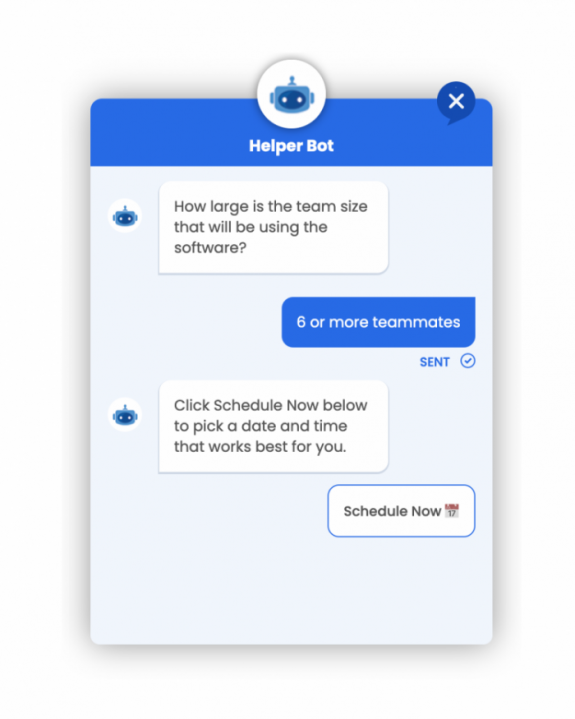
And this is how it looks on the visitor side.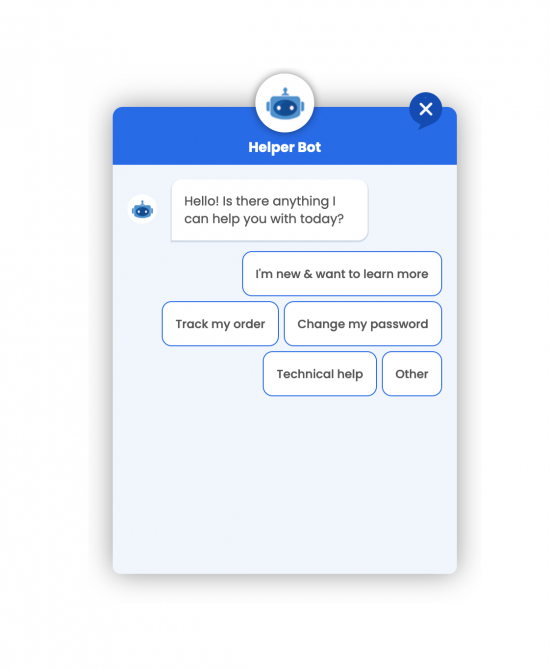
Now that we have defined a few buttons, let’s select what step the bot should go to when each particular button is selected by the visitor. But first, we will save our bot progress so far by clicking Save in the top right corner.
Choose +Create new Step from the dropdown to the right of each button. You will notice the steps are automatically created on the lefthand side of the screen to continue configuring our bot.

You can even edit the auto-generated title for a given step to something more easily recognizable by clicking the pencil icon next to the step title. Note: this is only for your reference as it will not display to the visitor in any way.

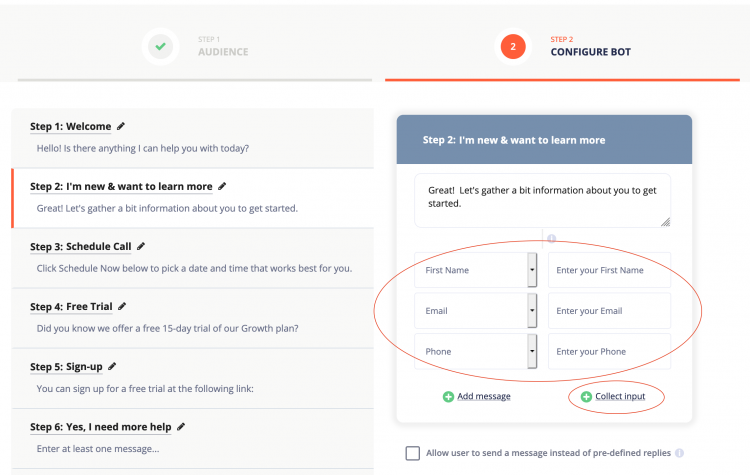
For each step — beginning by selecting the step ‘I’m new & want to learn more’ — we’ll configure what we want the bot to do next. In this case, let’s enter a message of “Great! Let’s gather a bit more information about you to get started.”.
We can now collect important lead information from the visitor by clicking +Collect Input. Let’s click it 3 times so that we can request the visitor’s First Name, Email, and Phone Number.
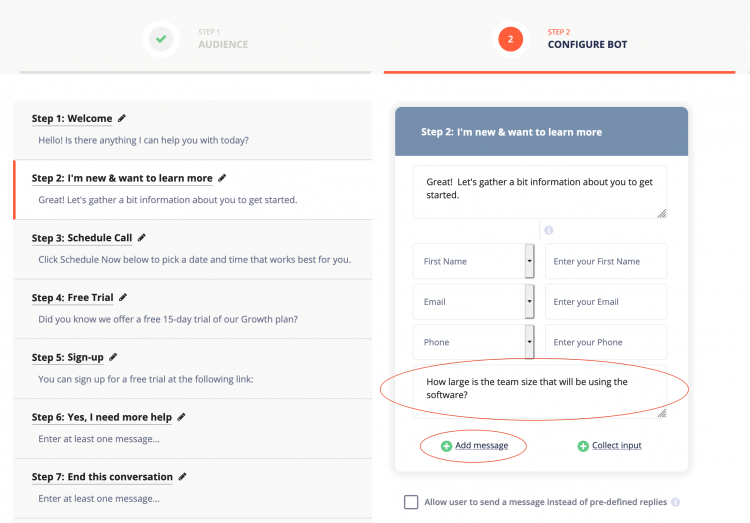
Next, we will click +Add Message to create another message bubble and ask the visitor “How large is the team size that will be using the software?”. By design, this question will only be shown after the initial 3 input fields have been filled out by the visitor as to not overwhelm them with messages right away.
Quick tangent: In any given step you can even check the box next to the option to “Allow user to send a message…” as an additional outlet for the visitor. For example, if you have a bot that asks a visitor to share some feedback on their experience with your product or services, the bot could display a message such as “Please let us know how we did” and simply wait for the visitor to enter a reply before moving to the next step in the flow if one is configured.
Now back to our example! Asking about the team size gives us a chance to determine the size of the business opportunity so that we can make further decisions as to whether this would be a good lead to send right to our sales team or pitch a free trial (self-service option) instead.
Obviously you can configure your bot to collect information and ask questions of your visitors that best pertain to your industry. For example, if you’re a realtor you may ask the visitor whether they are looking to buy or sell a home soon. Or if you repair iPhones, simply asking whether this situation is an emergency may determine a sale opportunity, versus someone just curious on general pricing and not ready to make a decision.
Since we’re asking the visitor how large the team size is in this example, let’s give them a few options to choose from by clicking Add Reply Buttons and configuring the reply buttons “Just me”, “2-5 teammates”, or “6 or more teammates”.
Similar to earlier, we can choose +Create new step from the dropdown next to our button options and setup additional steps for the bot to know what to do when each button is clicked. Using our trick to edit the title of the auto-generated steps, you’ll see we have already modified the step names and selected the appropriate choices for each button selected as shown.
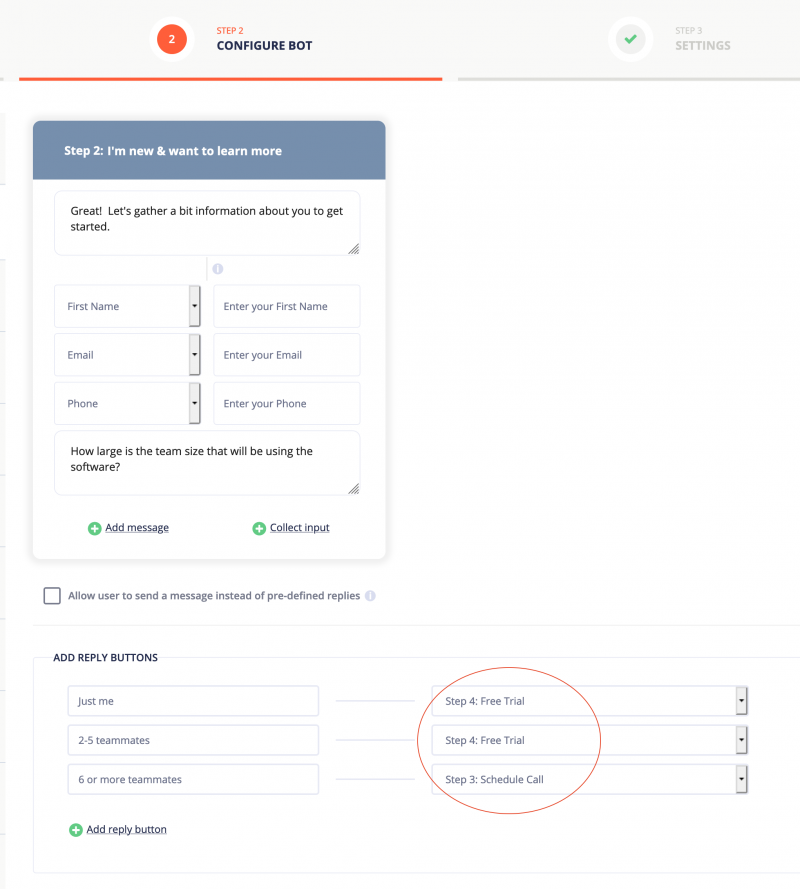
If the visitor selects Just me, or 2-5 teammates, we have opted to display free trial information to encourage them to sign-up. In the event they choose 6 or more teammates, we’ll consider this a great sales opportunity and pitch the visitor to schedule a call or demo.
Rather than go through each step’s configuration in this tutorial, let’s break down the scheduling step given it is different from some of the previous steps we have already completed.
Select the Schedule Call step from the lefthand side of the screen, and modify the step with the following message and click Execute Actions.
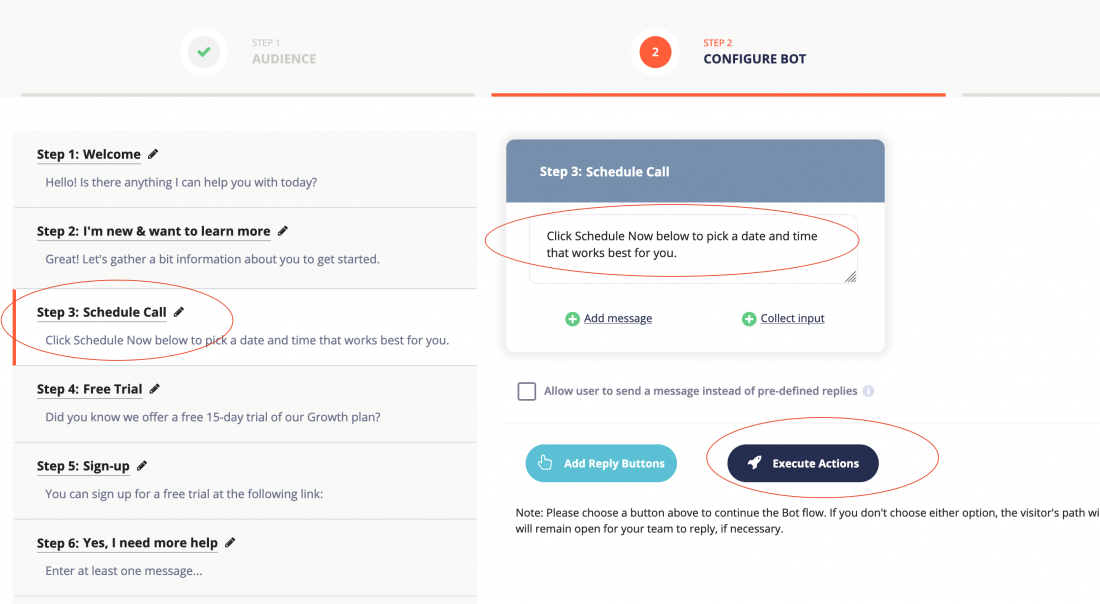
Upon clicking Execute Actions, we can click Add action and choose Show Calendly App to display an inline calendar scheduling option to the visitor. If you’ve never used Calendly before, it’s a popular online scheduling tool that can hook into your Google, Outlook, or Mac calendar and display available date/time slots for customers to book directly on your calendar. They have a great free plan as well.
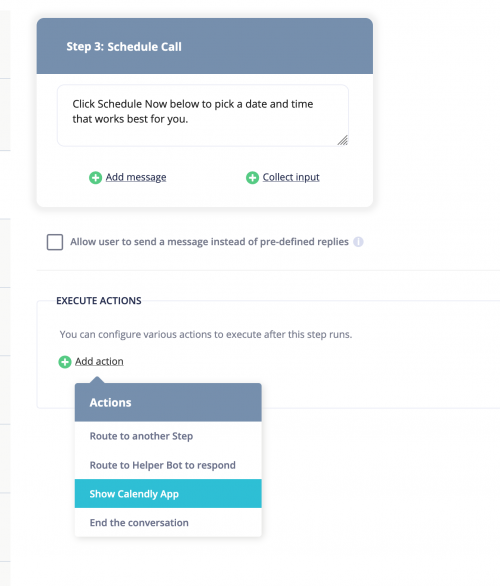
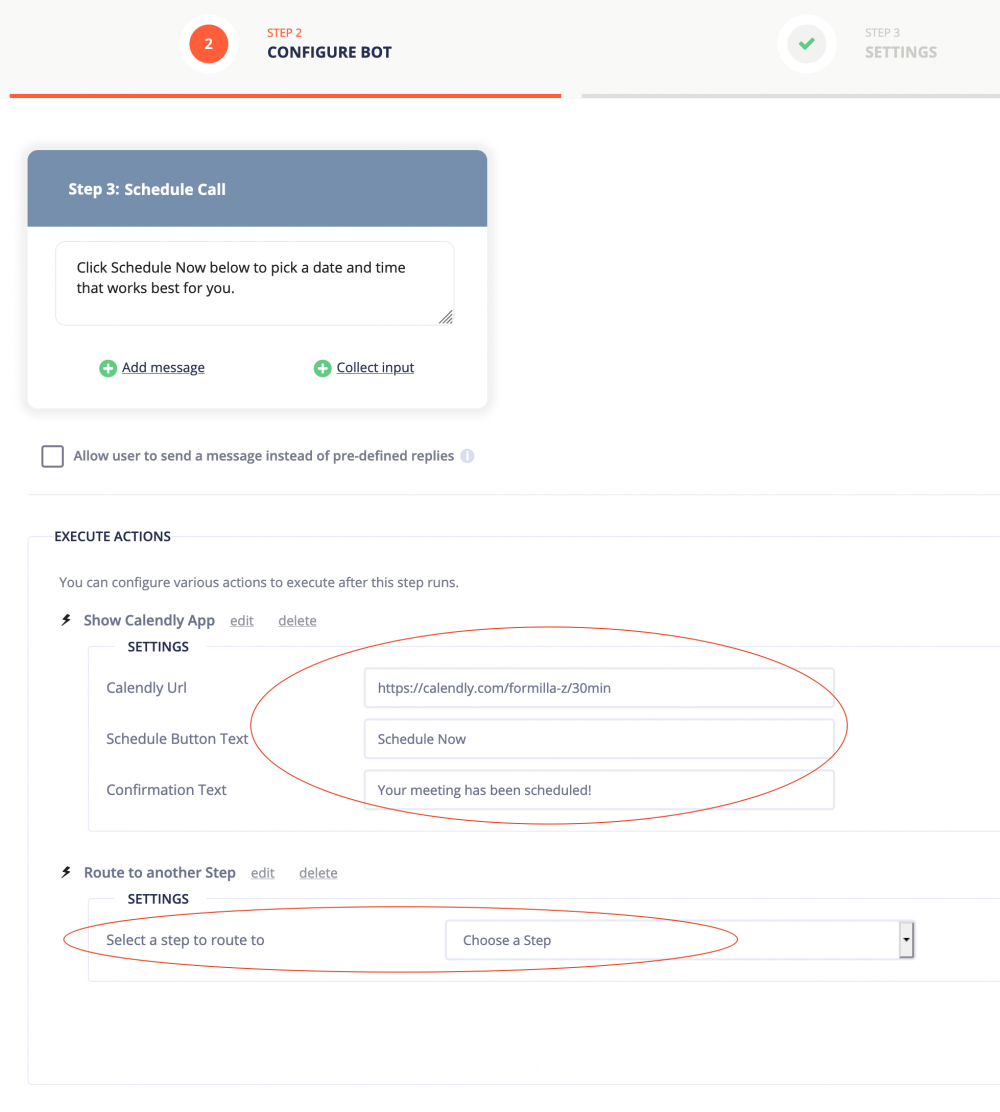
Assuming you have a Calendly account already, you can configure it within the app here with the appropriate link to your calendar. We can also click Add Action and choose Route to another step to have the bot send the visitor to a final step in the flow after booking (e.g. a step that simply states ‘Thank you, we look forward to meeting with you!’), or even End the conversation right here if we want the bot to finish the process.
Formilla’s Helper Bot is capable of responding to common visitor questions 24/7. It uses A.I. (Artificial Intelligence) to determine the correct answer to a minimum confidence level that you specify, and can be continuously trained to improve its accuracy.
It is possible to configure a step within your Custom Bot design that allows the user to send a message (remember the feature we discussed earlier) to a Helper Bot for the answer.
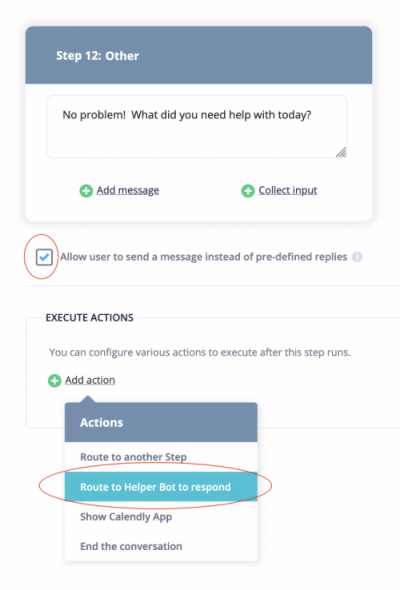
For example, in this tutorial we setup our triage bot to open with the question “Hello! Is there anything I can help you with today?”, followed by a few reply buttons for the visitor to choose from. If none of the reply buttons displayed are relevant to the visitor, they can choose ‘Other’ instead and we can configure our bot to route to a step which states: “No problem! What did you need help with today?”
The step can then be configured with an Event Action to “Route to Helper Bot to respond” to take over from there.
Step 3 of the Custom Bot setup process is the Settings tab. Here we can set a custom image for our bot, give it a name, and define some additional important options as shown below.

As you set up your custom bot(s), the business use case for each bot will be the deciding factor in whether you “Make this bot the first thing users see when starting a chat”, and whether it should proactively pop-up to encourage engagement from visitors.
To start, here are a few common use cases for when to enable the option to “Make this bot the first thing users see when starting a chat” :
By selecting ‘Yes‘, the bot will automatically jump right into Step 1 of the flow when the visitor clicks your chat button, without allowing them to bypass the bot.
It is also helpful to understand cases where selecting ‘No‘ is better. For example, if you set up a bot that pops up to inform a customer of a new product or service you launched, this is not a bot you would want to make the first thing users see when starting a chat. It is simply informative. If the customer dismisses the bot and eventually tries to chat, it would be better to have a triage bot be the initial state, generally speaking.
Needless to say, proactively popping up after a few seconds to engage with visitors will be a good idea in many custom bot use cases. Just to give one example, a custom bot setup to generate sales leads will perform better by automatically popping up to encourage engagement from website visitors. Use your best judgment when configuring your bots to popup proactively, and test the behavior (more on this below).
You may need to set a priority order for your custom bots when a visitor qualifies for more than one to be displayed, especially when you have multiple bots set up to automatically pop up. To find the prioritization screen, simply click Automation in the left menu, then select Custom Bots from the sub nav that appears.
You will notice there are four custom bots created in the image below. By clicking the grid icon next to a given bot, you can drag and drop the rank order with the first row being the highest priority.
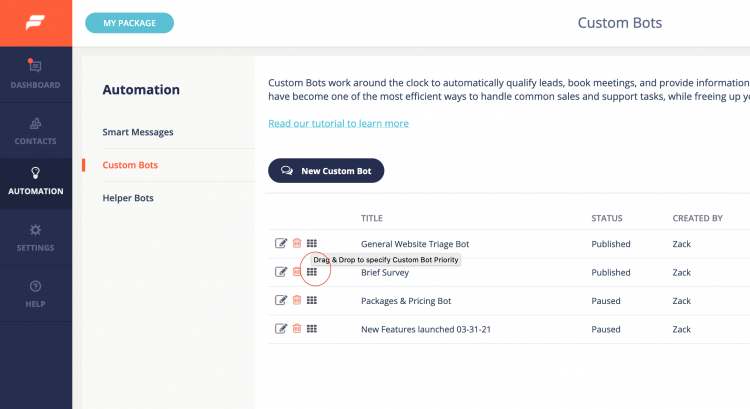
The same example shows that we have chosen to display the triage bot first when a visitor qualifies, as we have determined it is a more important bot than the brief survey bot. Once the triage bot pops up during the web session and is interacted with or dismissed, the next bot in the priority order will be shown if the visitor still qualifies on the next page navigation.
Earlier we walked through how you can configure a bot to gather lead information from a visitor by ‘collecting input’ fields such as First Name, Last Name, Email, and Phone Number. Keep in mind your bot will intelligently skip a step that asks for this information if it is already known, or in other words because the bot has already requested and collected the data for the same visitor previously.
In the event you’re requesting custom information outside of the four fields mentioned, these will always be requested again without being skipped (e.g. if you’re requesting the visitor enter their tracking number, order number, customer #, etc.).
As you design your Custom Chat Bot, it will be important to test different paths throughout the flow to ensure the behavior is what you expect it to be.
When you open the chat widget on your website and interact with the bot flow as a visitor would, this will start a chat conversation with the bot and also appear on the live chat dashboard in the Formilla backend. Often times you will reach the end of a given bot path and will need to restart the chat conversation to test an alternate flow. This can be accomplished by simply selecting the chat from the agent dashboard to open the conversation, and then clicking on the ‘X’ in the top right corner to end it. From the visitor side you can now refresh the webpage and start a new chat conversation with the bot again.
It may also be necessary to open a new private/incognito browser to appear as a brand new visitor on your website when testing the input collection fields mentioned in the section above. This will ensure you are not a ‘known’ visitor with information collected and can be prompted by the bot for the data accordingly.
As always please feel free to contact us at support@formilla.com if you have any trouble setting up your Custom Chat Bot, or if you have any other questions!
